- For how to handle having multiple region maps, see Multiple regions.
- For linking a game map to a particular spot on the region map, see Maps.
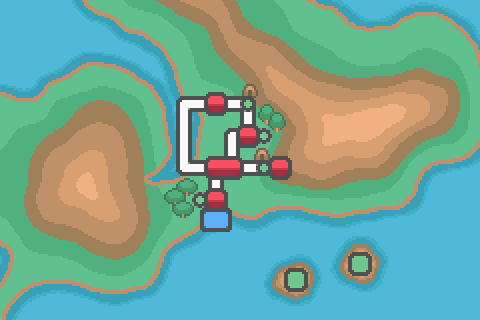
The Essen region map.
The region map (also known as the Town Map) is the picture that shows the entire region. This page describes how to set up a region map.
It should not be confused with a game map - those are the overworld areas the player walks around in, each of which typically depicts a single town or route, and are often linked together.
Viewing the region map[]
The region map can be viewed with the following method:
pbShowMap
pbShowMap(0)
The first example will show the map of the region the player is currently in. To show a particular region's map, put its number as an argument like in the second example (the default number is -1, which means "the current region").
These examples will both show the public version of that region map (as opposed to the player's version which is accessed via the Pokégear or the Town Map item). These are typically placed on the walls of Poké Centers and some other places.
A public region map will remain exactly the same regardless of the player's progress through the game. The player's version of the region map can/will record the player's progress through the game.
The region map picture[]
Every region map is divided into a grid of squares. By default, each square is of size 16x16 pixels (defined by the constants SQUARE_WIDTH and SQUARE_HEIGHT in class PokemonRegionMap_Scene). A small town is typically considered to be 1 square in size.
A region map should be 480x320 pixels in size, which contains 30x20 squares by default. The number of squares across is determined from the constants RIGHT and LEFT, and the number of squares down is determined from the constants BOTTOM and TOP (all in class PokemonRegionMap_Scene).
As the region map is grid-like, it is important that the towns and routes line up with this grid, so that the cursor and other icons are positioned properly over the locations. Aside from that, though, you can do whatever you want.
The region map pictures belong in the folder "Graphics/Pictures".
Extra graphics[]
You can show additional pictures on (the player's version of) the region map at certain times, such as islands which originally weren't there but were unlocked once visited. The newer official games do this.
The script section Settings contains an array which looks like this:
REGION_MAP_EXTRAS = [
  [0, 51, 16, 15, "mapHiddenBerth", false],
  [0, 52, 20, 14, "mapHiddenFaraday", false]
]
Each line (itself an array) describes the details of a graphic to paste over a region map. It is made up of the following information:
- The number of the region which this graphic can be pasted into.
- The Game Switch which needs to be ON in order to show this graphic. These only applies to the player's version of the region map.
- The x-coordinate in squares where the left side of the graphic should be pasted.
- The y-coordinate in squares where the top of the graphic should be pasted.
- The name of the graphic. It is placed in the folder "Graphics/Pictures".
- Whether the graphic should be shown on the public version of the region map.
The additional graphic has different criteria for being shown depending on whether the map being viewed is the public version or the player's version. Guidelines on how to define these criteria are as follows:
- Locations which can be unlocked by the player, but are otherwise not known about before then (e.g. islands which are home to a legendary Pokémon) should only be shown on the player's version. The last piece of information will be "false", so the location will never appear on public maps.
- The icons for towns and cities may appear greyed out at the start of the game, but are coloured in as the player visits them. In this case, a public map should show all the towns/cities coloured in regardless of the player's progress. In this case, the last piece of information for each coloured town icon should be "true".
The same graphic can be used multiple times in different positions (e.g. a coloured city's icon).
Adding information to the region map[]
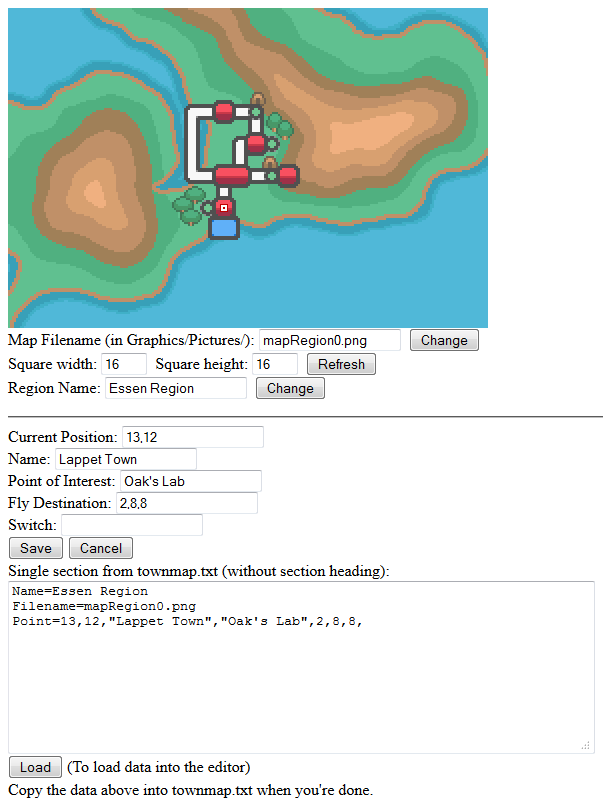
Each square of the region map can be given a variety of information (see the table below). To do this, you can either edit the PBS file "town_map.txt" directly, or you can use a special html file included with Essentials called "townmapgen.html" to help you.
Each region defined in the PBS file "town_map.txt" has its own section, which begins with the region number in square brackets (the first/default region number is 0). Then the name of the graphic file depicting the region is defined, then the name of the region, then information about each square (or "point"). For example:
[0]
Name = Essen
Filename = mapRegion0.png
Point = 13,12,Lappet Town,Oak's Lab,2,8,8,
Point = 13,11,Route 1,,,,,
Point = 13,10,Cedolan City,Cedolan Dept. Store,7,47,11,
Point = 14,10,Cedolan City,,7,47,11,
Point = 14,9,Route 2,,,,,
Point = 14,8,Route 2,,,,,
Point = 15,8,Lerucean Town,,23,11,15,
Point = 18,17,Berth Island,,,,,51
Point = 22,16,Faraday Island,,,,,52
#-------------------------------
[1]
Name = Tiall
Filename = mapRegion1.png
Point = 13,16,Here,,,,,
Any line beginning with "#" is a comment and is ignored. The #------- line is used here to help visually separate the information for different region maps.
The information each square of a region map can have is as follows:
| Information | Description |
|---|---|
| Current Position | The x and y coordinates of the point on the region map, in squares. Every point must have these coordinates. This is filled in automatically when you click a part of the map in "townmapgen.html".
You cannot have more than one line in the same region with the same coordinates. |
| Name | The location's name (e.g. Route 101, Rustboro City, Mt. Moon).
Several squares can have the same name (e.g. you can give both squares of a large city that takes up 2 squares the same name). |
| Point of Interest | Optional. The name of a particular building or cave or other feature within that location (e.g. Pokémon Tower, Desert, Safari Zone). You can only have one Point of Interest per square. |
| Fly Destination | Optional. This is a Fly destination, and is three comma-separated numbers: the map ID followed by X and Y coordinates of the location Fly will take you to when you choose this square to Fly to. This location is usually directly in front of a Poké Center building or the player's house. |
| Switch | Optional. If this is a number, then the Game Switch of that number must be ON in order to show the square's information. That is, the map's name and Point of Interest will not be shown unless that Game Switch is ON. This only affects the player's version of the region map; the public version never shows the information for these squares.
Multiple squares can depend on the same Game Switch. Typically used for special locations outside of the storyline. Note that only the name and Point of Interest are not displayed; you can still Fly there (if "Fly Destination" is defined). However, since you can only Fly to maps you have already visited, this shouldn't usually matter as you would set this Game Switch ON at the same time as visiting the map. |
As seen in the examples above, all commas must be written in a line even if some values are blank. There should be 7 commas in total, because there are 8 values.
Note that the ONLY way in which the region map corresponds to game maps is when "Fly Destination" is defined.
Conversely, the ONLY way in which game maps correspond to the region map is when the "MapPosition" map metadata is defined for a game map. This metadata is used for several things, including showing the player's current location.
townmapgen.html[]
townmapgen.html
"townmapgen.html" can be found in the game project's main folder. When it is opened, it loads the file at "Graphics/Pictures/MapRegion0.png" and sets the square size (in pixels) to 16x16. You can then load a different map image to work on and change the square size if you want.
From here, select a square by clicking on the map (a small white dot will appear over the chosen square) and fill in the details. Once you have done so, click the "Save" button to convert the information for that square into text in the box at the bottom of the page.
The information is converted into the correct format required for the PBS file "town_map.txt". You need to copy this line and paste it into "town_map.txt". You can define multiple lines and then copy them all across at once.
You can also paste lines from the PBS file "town_map.txt" into the big text box and then click the "Load" button to make all their white dots appear on the map image and be editable.
Icons on the map[]
The player's current position, and the valid Fly destinations, can be marked on the map by icons. These are located in the folder "Graphics/Pictures", and are called:
- mapPlayerXXX.png - "XXX" is the ID of a trainer type, i.e. of the trainer types the player can have.
- mapFly.png - The two-frame icon that indicates a valid Fly destination.
The player's current position will always be shown on the map, and the Fly destination icons will only be shown when using the move Fly.
Note that the Fly destination icon is only a single map square in size. You should not have two squares adjacent to each other which are both Fly destinations, as the Fly icons will overlap. For locations spanning multiple squares that can be flown to (e.g. large cities), it is recommended that only one of those squares be a Fly destination to avoid overlapping icons.